
Ever think a small metal strip can stop water damage? Installing a roof drip edge guides rain into your gutters and shields your home’s frame. It works like a barrier that keeps water away from sensitive areas. In this guide, we cover each step: first, line your fascia board (the board that hides the edge of your roof) and then nail the drip edge into place. We show you how to create a proper overlap so water can flow freely. All measurements are given in both inches and centimeters so you can follow along easily and boost your home’s protection without any fuss.
Step-by-Step Roof Drip Edge Installation Guide
-
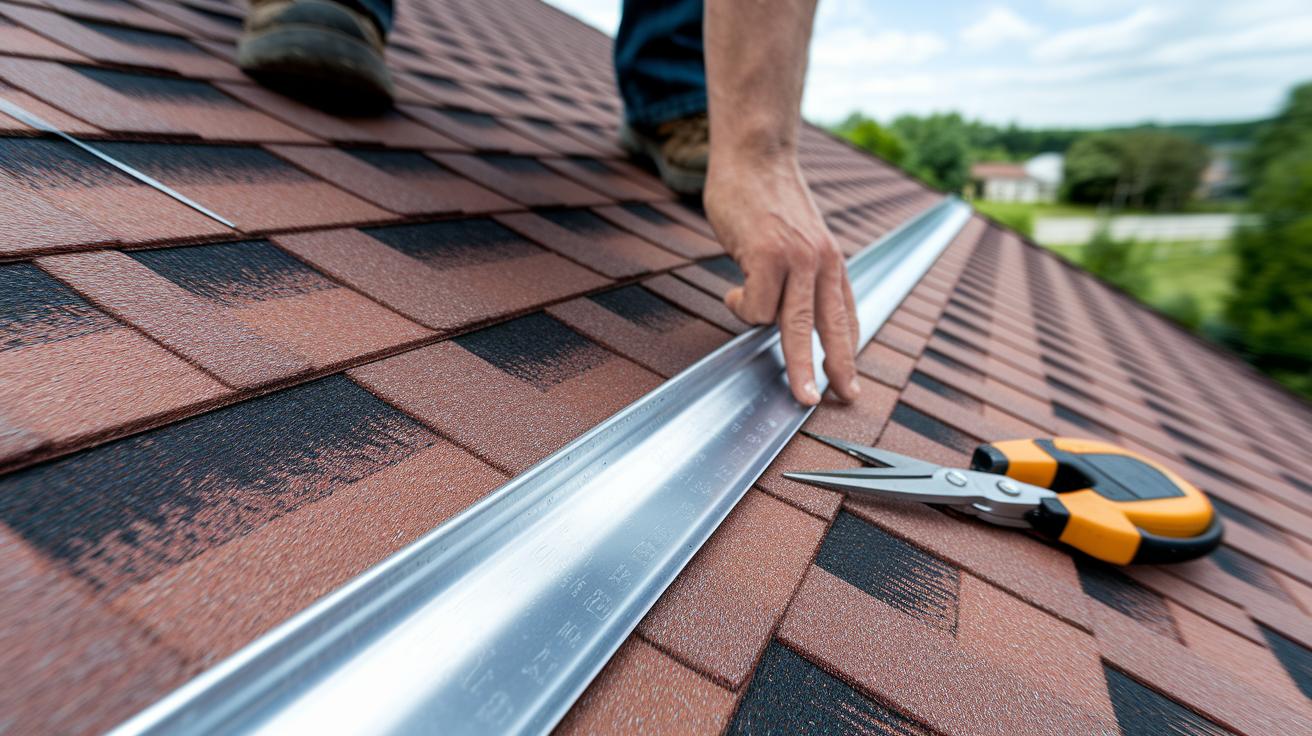
Start by lining the metal drip edge along the fascia board. This thin metal strip channels water into your gutters and shields the layers beneath. Make sure it sits straight before nailing.
-
Hammer in your first nail about 2–3 in (5–8 cm) above the fascia board. This initial nail holds the edge in place so it won’t shift as you work.
-
Add more nails at intervals of 8–10 in (20–25 cm). This steady spacing keeps the metal flush against the roof deck and stops loose areas.
-
Overlap each piece by at least 2 in (5 cm) so one piece covers the next. This ensures that water flows smoothly without seeping through gaps.
-
Press the drip edge firmly against the roof deck to avoid any bumps. A smooth, even surface stops water from pooling and causing damage.
-
When joining sections, angle the overlaps away from driveways or walkways. This approach hides seams and keeps water on the proper path.
-
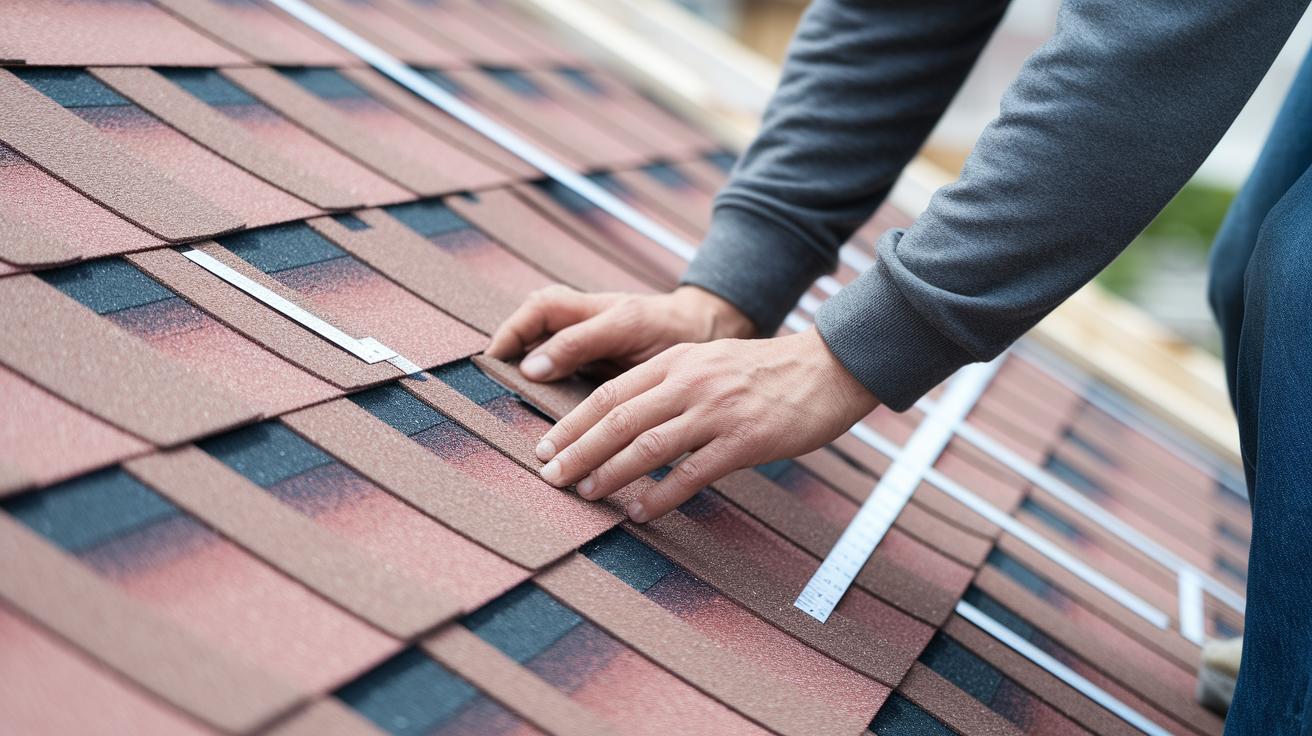
At the eaves (the flat bottom edge of the roof), install the drip edge first, then lay the underlayment (protective layer) over it. On the rakes (the angled sides), put down the underlayment before the drip edge to block wind-driven rain. Following the right order is key to waterproofing.
-
Finally, let the drip edge extend about 0.5–0.75 in (13–19 mm) beyond the fascia board. This small overhang directs water straight into the gutters and helps protect the fascia from moisture damage.
roof drip edge installation Elevates Home Protection
Start by choosing a quality metal drip edge flashing that is either galvanized (treated with a protective zinc coating) or made from other corrosion-resistant metal. Plastic options might not meet code requirements and generally don’t last as long.
Before you begin, gather your tools and materials. You will need galvanized roofing nails, sized around 1¼ in (32 mm) to 1½ in (38 mm), to secure the flashing along the roof edge. Use tin snips or metal shears to cut the metal for corners and overlaps. A measuring tape and chalk line will help you mark precise cuts and nail placements. Finally, drive your nails every 8–10 in (20–25 cm) using a framing hammer or a pneumatic nail gun for a snug fit.
Remember to include the roof underlayment and shingles. The underlayment protects the roof deck from moisture, while shingles create the final waterproof layer.
Safety comes first, wear work gloves, safety goggles, and fall-protection equipment (such as recommended construction safety gear) to protect yourself from sharp metal and potential falls.
Roof Drip Edge Profiles and Material Types
L-Shaped Drip Edge
The L-shaped drip edge has a simple design that works for normal roof overhangs. It guides rainwater off the roof and away from the fascia board. Made from aluminum or steel, it is a tried and true option for typical eaves and rakes when installing a metal roof drip guard.
T-Shaped Drip Edge
The T-shaped drip edge features an extra mid-lip that gives you more protection behind your gutter bottoms. Typically made from galvanized steel, it is a popular choice for metal roof applications. Its design helps block wind-driven rain, keeping water away during heavy downpours.
Wide Flange Drip Edge
For spots that face tough weather, the wide flange drip edge provides heavy-duty protection. Its broad flange, crafted from copper or steel, gives extra coverage against moisture. This drip edge is ideal for edges that face high exposure.
| Profile | Material | Best Use |
|---|---|---|
| L-Shaped | Aluminum, Steel | Standard eaves and rakes |
| T-Shaped | Galvanized Steel | Gutter bottoms and metal roofs |
| Wide Flange | Copper, Steel | High-exposure edges |
Drip Edge Installation Techniques for Eaves vs Rakes
Step 7 covers how to install the drip edge on both flat eaves and sloped rakes.
For eaves, start by fixing the drip edge using a 0.5 to 0.75 in (13–19 mm) overhang past the fascia. Measure carefully: position the drip edge so it hangs 0.5 to 0.75 in (13–19 mm) over the fascia to catch every drop. Then, roll the underlayment over the edge. This directs water into the gutter and keeps the fascia dry.
For rakes, lay the underlayment first, then add the drip edge. This order helps stop wind-driven rain from reaching the roof yourself. Make sure each piece overlaps the one under it by at least 2 in (5 cm). Also, fasten the drip edge every 8–10 in (20–25 cm) and keep it flat against the roof deck to block water.
- Follow the steps in the correct order.
- Ensure proper overlaps and nail spacing.
- Keep the drip edge securely in place to prevent moisture problems.
Common Mistakes in Roof Drip Edge Installation
One common issue is lap overlaps that measure less than 2 in (5 cm). When the pieces don’t overlap enough, water can sneak through and cause decay. If you spot a joint where the overlap is under 2 in (5 cm), be aware that water might bypass the barrier.
Another mistake to watch out for is placing nails too close to the edge. When nails are too near the drip edge, they can pull the metal or even split it. Imagine a nail acting as a pivot that eventually forces the drip edge away from the roof deck.
If the drip edge isn’t flush against the roof deck, it may lead to buckling. A small gap can allow water to pool, and freeze-thaw cycles can damage the flashing. Make sure to measure and cut each section precisely so it fits snugly.
Overhang length is also key. An overhang shorter than 0.5 in (13 mm) can scatter water onto the fascia, while an overhang over 0.75 in (19 mm) might catch wind uplift. Get the measurement just right for proper protection.
Lastly, retrofitting the drip edge over installed shingles can cause brittle shingles to crack if the first row isn’t lifted carefully. Plan ahead, work gently, and protect your shingles.
- Lap overlaps less than 2 in (5 cm)
- Nails placed too near the edge
- Drip edge not flush with the roof deck
- Incorrect overhang measurements
- Retrofitting without proper care
Maintenance Tips for Roof Drip Edge Systems
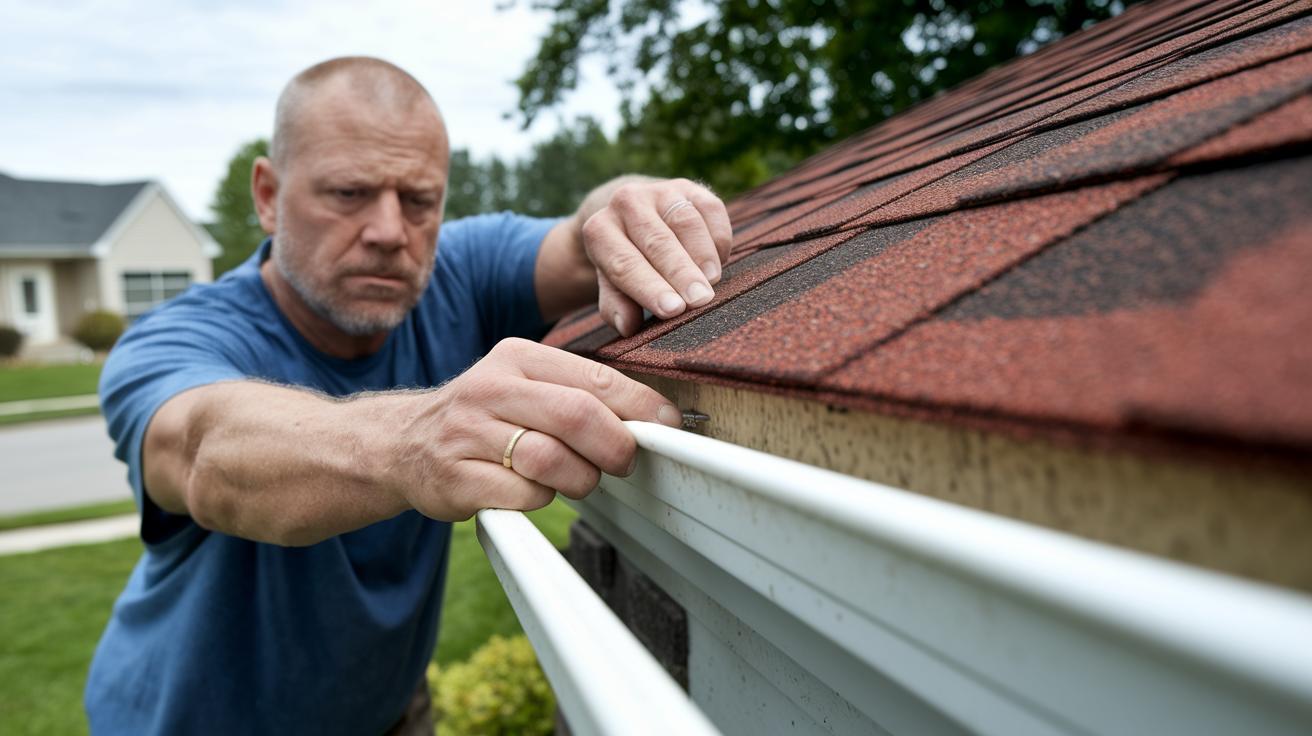
Keeping your roof drip edge in good shape helps prevent water from damaging your home. Every 6–12 months, take a close look at the drip edge. Look for bends, loose parts, or rust spots. Catching small issues early can stop bigger problems like moisture seeping into your structure.
Clear out any debris from your gutters and from under the drip edge. Leaves, twigs, and dirt can block water flow and may cause ice build-up in colder weather.
- Check the drip edge for any bends or loose nails.
- Remove debris from both the gutters and the area beneath the drip edge.
- Re-secure any loose nails as soon as you find them.
- Replace any flashing that shows rust or damage.
- Think about installing gutter protection to help keep the water flowing freely.
Taking these simple steps regularly will keep your roof system working well and protect your home from water damage.
Building Codes and Best Practices for Roof Drip Edge Installation
Since 2015, Virginia requires a drip edge along both the eaves and rakes. Choose corrosion-resistant flashing, like galvanized steel or aluminum, to meet local codes. Make sure the flashing sticks out 0.5–0.75 in (13–19 mm) past the fascia board and that each section overlaps by at least 2 in (5 cm). This setup keeps water flowing straight into your gutters instead of sneaking behind the fascia.
Note: Always check local codes and the flashing manufacturer's instructions before you start. A proper overhang helps direct water into the gutters, which is key for preventing water damage.
Key installation points:
- Use corrosion-resistant metal flashing.
- Ensure a 0.5–0.75 in (13–19 mm) overhang on the fascia board.
- Overlap each flashing piece by at least 2 in (5 cm).
- Follow local code requirements and manufacturer guidelines.
- Secure with evenly spaced nails and firm fastenings.
Final Words
In the action, this guide walked through each step of roof drip edge installation. It explained how to align the drip edge, secure it properly with nails every few inches, and handle overlap for eaves and rakes. It also reviewed the tools, materials, and maintenance tips needed to keep your roof in top shape.
Following these clear instructions helps you protect your home from water damage while keeping the project on time and within budget. Keep practicing these steps, and your roof drip edge installation will be durable and effective.
FAQ
What does the roof drip edge installation video show?
The roof drip edge installation video demonstrates aligning the metal flashing over the fascia, proper nail placement every 8–10 inches, and overlapping pieces to direct water safely into gutters.
How is metal roof drip edge installed?
The metal roof drip edge installation involves fitting galvanized or corrosion-resistant metal along eaves and rakes, nailing it securely with 2-inch overlaps, and positioning it to properly direct water away from the fascia.
What does a roof drip edge installation diagram illustrate?
The roof drip edge installation diagram illustrates how to align the flashing over the fascia board, shows proper nail spacing, overlapping measurements, and the correct overhang to channel water into the gutters.
What happens when the drip edge is installed wrong?
Installing the drip edge wrong can cause insufficient overlaps, buckling due to improper fastening, scattered water on the fascia, and longer-term moisture damage to roof structures.
How can I install a drip edge on an existing roof?
Installing a drip edge on an existing roof may require gently lifting the first course of shingles, positioning the metal flashing accurately, and securing it with nail placements to maintain proper water flow without damage.
What is drip edge flashing and how is it used?
Drip edge flashing is a metal trim installed along the roof eaves and rakes to direct water into gutters, protecting the fascia board by creating a secure, overlapping barrier against moisture.
How do you install drip edge with gutters?
When installing drip edge with gutters, position the flashing so it overhangs the fascia by 0.5–0.75 inches, ensuring water flows directly into gutters without spilling onto the roof instead.
How do you cut drip edge at the peak?
Cutting the drip edge at the peak requires measuring the correct length, using tin snips or metal shears for a clean, straight cut, and ensuring a proper fit that maintains overlap and waterproof protection.
How should drip edge be installed for proper water management?
Drip edge should be installed by aligning it over the fascia board, nailing every 8–10 inches with at least a 2-inch overlap, and extending slightly past the fascia to direct water into the gutters effectively.
Does drip edge go over or under underlayment?
On eaves, the drip edge goes first with the underlayment applied over it; on rakes, the underlayment is installed first followed by the drip edge to block wind-driven rain effectively.
Can drip edge be added to an existing roof retrofit?
Yes, a drip edge can be added to an existing roof, although you might need to lift shingles carefully and secure the metal flashing without compromising the integrity of the roof system.
Is drip edge supposed to extend into the gutter?
Drip edge should not extend into the gutter; it is meant to overhang the fascia just enough to direct water into the gutter while protecting the roof edges effectively.