
Ever wonder if your wall studs are lined up for a solid, safe structure? One stud measured wrong can throw your whole project off. In this guide, you'll learn how to layout wall studs step by step.
- Mark the first stud clearly.
- Use a tape measure and a framing square (a tool that checks for right angles) to set your spacing.
Follow these steps carefully to create a layout that keeps your walls straight and strong.
Step-by-Step Guide to Measuring Stud Layout for Walls
-
First, mark the starting stud on the sole plate.
Use a tape measure (a long, marked rope for measuring) to find the beginning point and mark the center of the stud. Draw a straight line at the plate’s edge. A framing square (a tool that ensures right angles) helps keep the line square. -
Next, set your stud spacing.
Light framing usually spaces studs 16 in (40.6 cm) apart from center to center. In some cases, 19.2 in (48.8 cm) spacing works better, especially for aligning with 8 ft (243.8 cm) sheet widths. Adjust this spacing to suit your project. -
Factor in your wood dimensions.
Remember, a 2×4 (actual 1.5 in x 3.5 in / 38 mm x 89 mm) is different in size than a 2×6 (actual 1.5 in x 5.5 in / 38 mm x 140 mm). These sizes impact the wall’s strength and the way you place the sheet materials. -
Then, measure and mark the remaining stud positions.
Using your tape measure, continue from the first mark and apply your chosen spacing. A stud finder (a tool that locates studs behind drywall) can help verify proper spots without needing to remove the wall covering. -
Check your overall layout.
Add up the stud widths and spacing to make sure your measurements add up. Use a framing square to transfer your marks from the floor plate to the ceiling plate, and snap a chalk line as a handy reference. -
Optional: Use tool assistance.
Online calculators can create to-scale diagrams with a slider for accurate printing. Use these diagrams to double-check your marked positions before you cut or assemble the plates.
Essential Tools and Techniques for Accurate Stud Layout Measurement
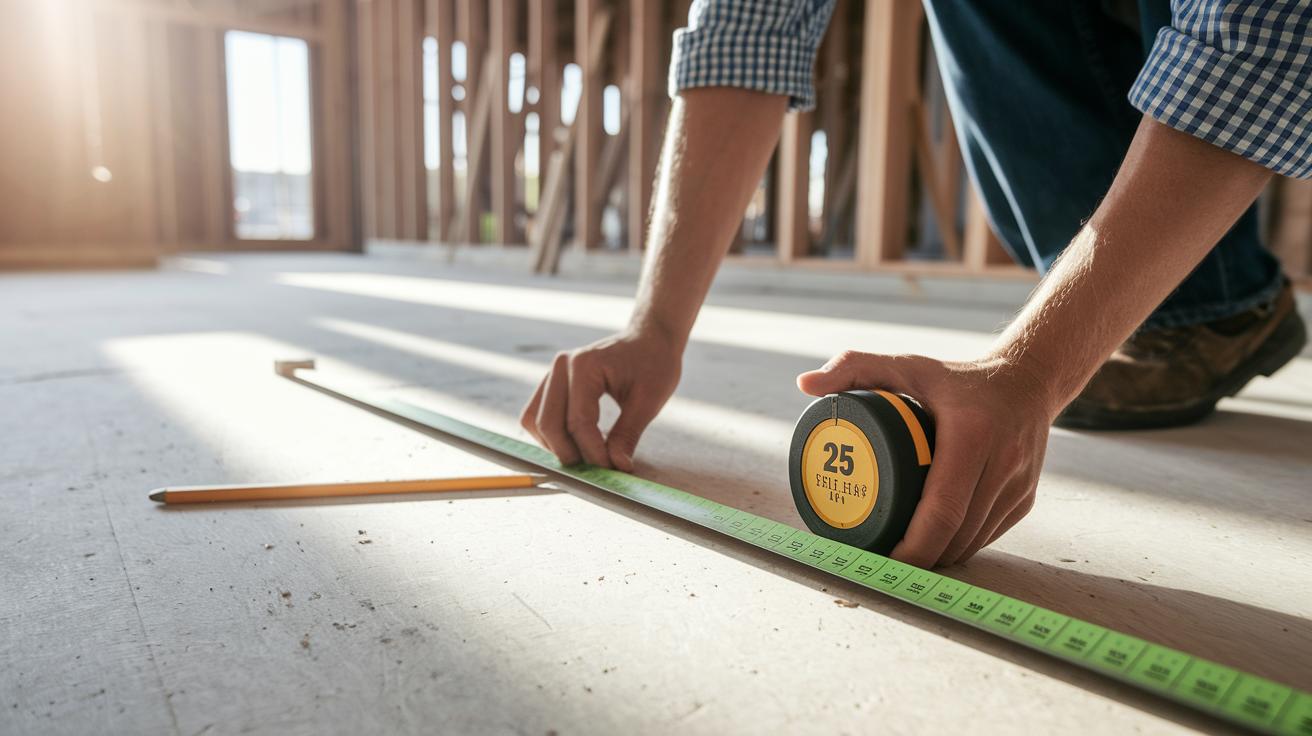
You need a few solid tools for a perfect stud layout. Grab a 25 ft (7.6 m) tape measure that locks in place, an electronic stud finder (or one with magnets), a framing square (for checking right angles), a level (to keep things straight), and a pencil or chalk line for marking your work.
Hold the tape measure tight to remove any slack and lock it in at the spot you need. For example, pull firmly and lock at 10 ft (3.0 m) to mark the center line correctly. Keep in mind that you should adjust for drywall or plaster thickness when placing your stud marks.
At the ends of the plates, use your framing square to create 90° angles, making sure your layout is perfectly square. Use the level to check that each stud is plumb, which is key for keeping your structure stable. You can also use a laser-assisted tool for long runs, but always check it carefully so that small errors don’t add up.
Mark all your measurements clearly with a pencil or snap a chalk line for a straight guide. This extra step cuts down on mistakes during your layout and cutting process. Following these clear steps will help your wall framework line up right from start to finish.
Standard Stud Spacing and Code Compliance for Wall Stud Layout
When framing a residential wall, most builders use a stud spacing of 16 in (40.6 cm) on center. But sometimes, 12 in (30.5 cm), 19.2 in (48.8 cm), or 24 in (61.0 cm) spacing might be a better fit if your sheathing, load conditions, or local codes call for it. Always check local rules because load-bearing walls or structures in seismic or high-wind areas often need studs placed closer together.
Key points to keep in mind:
- Always work with the actual stud size. For instance, a 2×4 is really 1.5 in x 3.5 in (38 mm x 89 mm). This exact size matters when cutting plates and aligning your sheathing.
- Once you mark your first stud, measure each interval along the plate to confirm they’re in the right spot. A quick trick is to add up the distances along the wall to catch any gaps by the ends.
- Code compliance is all about safety. Make sure each stud is set to support the load as local guidelines require. Start with a solid layout and double-check each measurement. Remember: measure twice, cut once.
Locating and Marking Stud Positions in Existing Walls

To find hidden studs, start with an electronic stud finder. It senses changes behind the drywall. A magnet finder can also help by detecting nails or screws in the studs. Try tapping the wall lightly. A firm, solid sound means you’ve hit a stud, while a hollow sound means there isn’t one.
When you locate your first stud, measure 16 in (40.6 cm) from its center to find the next stud. This spacing is standard and helps with proper alignment for cutting or mounting.
- Use an electronic or magnet stud finder to spot the first stud.
- Tap the wall to double-check your mark.
- Measure 16 in (40.6 cm) from the confirmed stud center for each new mark.
- Transfer your marks from the floor plate to the ceiling plate.
- Snap chalk lines to draw straight, clear reference lines along the wall.
Troubleshooting Common Issues in Measuring Stud Layout for Walls
Stud layouts can go off track if you’re not careful. Common mistakes include uneven spacing, skipping extra studs at openings, and not accounting for the real dimensions of studs. Remember, a 2×4 actually measures 1.5 in x 3.5 in (38 mm x 89 mm). Overlook this detail and your layout can drift.
For windows and doors, always use two studs per opening. If the opening feels insecure, double-check that you’ve added extra studs or used a method like the Californian Corner technique, placing the second stud on the inner edge to allow for insulation clearance.
One way to verify your work is to measure the total span. Add every stud’s width plus the gaps between them and compare the sum with your plate’s length. For example, if you expect 10 studs at 1.5 in (38 mm) each along with 9 spaces of 16 in (406 mm) each, the total should match the plate length exactly.
- Measure from one end to the other, back-to-back.
- Check header supports, especially at openings.
- Use printed diagrams or PDF guides from online calculators (see "how to frame a wall step by step" at https://neull.com?p=206) to cross-check your field marks before nailing.
Final Words
In the action, this guide walked you through marking your first stud, using a tape measure with a framing square, and verifying measurements with a stud finder.
You reviewed standard stud spacing, complied with local codes, and tackled common errors with easy fixes.
These clear steps help you build sound projects and avoid complications.
Keep this guide handy when learning how to measure stud layout for walls, and enjoy a safe, cost-effective build.
FAQ
How to measure stud layout?
Measuring stud layout means you start at the sole plate, mark the first stud, and then measure center-to-center distances—usually 16 inches (40.6 cm) apart—with a tape measure and verified with a stud finder.
How to lay out 16 inch centers?
Laying out 16-inch centers involves marking your starting point on the sole plate, then measuring and marking 16 inches (40.6 cm) from the center of each stud along the wall to maintain even spacing.
Are interior walls 16 or 24 on center?
Interior walls can use either spacing; load-bearing walls typically use 16 inches on center, while non-load-bearing partitions may use 24 inches on center—but always verify with local building codes.
How to figure out where the studs are in a wall?
Figuring out stud locations means you can use an electronic stud finder or knock along the wall to detect solid areas, then measure 16 inches (40.6 cm) from a confirmed stud to find additional centers.