
Ever wonder how a small mistake in framing your window header can affect the entire project? This guide explains a clear method to secure your wall and fit your window perfectly. We start by marking the opening, then cutting the header lumber (wood used to support the top of the window), and finally checking that it fits level. Follow these steps to master a reliable technique that stands up to stress while keeping your project safe and on budget.
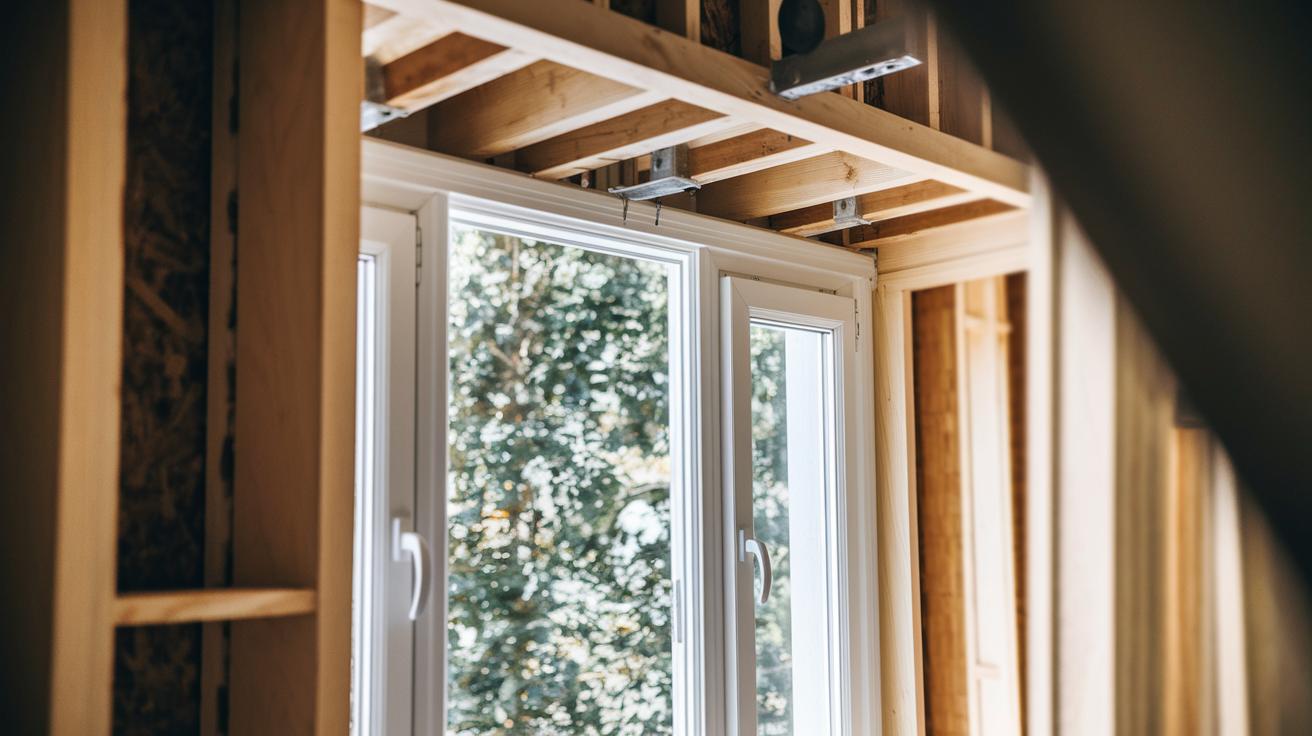
Step-by-Step Guide to Framing a Window Header
Mark your rough opening clearly. With a level, mark the full-length king studs (vertical supports on each side) and the shorter trimmer studs (supports for the header) on both the bottom plate (sole plate) and top plate. Measure from the window edge to set your marks. Remember: measure twice, cut once.
Next, cut the header lumber and the spacer board. You will typically use two 2×12 boards (actual 1.5 in x 3.5 in / 38 mm x 89 mm) with a spacer board in between. Use a carpenter’s square (a tool to check right angles) to verify that your cuts are square. A small mistake can weaken the header.
Then, assemble the header by face-nailing (nailing along the board’s edge). Use 10d or 16d nails spaced evenly along the edges to secure the boards together. Make sure the spacer board is flush with both header boards so the finished header matches the wall’s thickness.
After that, lift the header into place on the trimmer studs. Use shims (thin wedges made of foam or plastic) under the header to achieve a level fit. Brace the header temporarily with extra wood pieces to hold it steady until it is permanently fastened.
Finally, secure the header permanently using nails or approved metal connectors. Check that it is plumb (vertically straight) and level. This careful method ensures that the window header supports the wall above properly without sagging or misalignment.
Essential Components and Materials for Window Header Framing
A window header shifts the load away from openings. It uses two dimensional lumber members and a spacer board that matches the wall depth to help keep energy costs low. Think of the spacer as the missing puzzle piece that makes the header line up perfectly with the wall cavity.
Jack studs support the header on the sides, while king studs run the entire wall for added stability. For outdoor windows, use pressure-treated lumber to fend off moisture and decay. For indoor projects, choose high-grade, defect-free lumber.
Fasteners are important. Use 10d or 16d nails according to the code, and add metal connectors like hangers or straps in areas with high winds or seismic risks.
Design tips to keep in mind:
- Match the spacer thickness to the wall depth to boost thermal performance.
- Select the right type of lumber (pressure-treated for outdoors, refined grades for indoors).
- Follow a detailed fastener schedule for both solid construction and long-lasting support.
Key components checklist:
| Component | Description |
|---|---|
| Two dimensional lumber members | Main framing pieces |
| Spacer board | Matches wall depth to improve energy efficiency |
| Jack studs | Trim supports adjacent to the header |
| King studs | Full-length supports for stability |
| Fasteners & metal connectors | Includes 10d/16d nails and additional hangers or straps |
Calculating Loads and Sizing Window Header Framing
Start by keeping in mind that as the span and loads (from your roof, floor, or snow) increase, so does the needed header size. Check the IRC span tables for clear load-bearing assemblies. These tables show that openings from 2½ ft (0.76 m) to 12 ft+ (3.66 m) often require two 2×12 headers (actual 1.5 in x 11.25 in / 38 mm x 286 mm) with specific spacing. For example, a header over a 6 ft (1.8 m) opening might need studs set closer together if you’re dealing with a heavy snow load.
Next, plan by jotting down important details such as stud spacing, roof pitch, and local snow load. These factors tell you how much weight the header must carry. Quick tip: write down each number so you can quickly check them using a digital header span calculator. That calculator adjusts the header size based on local conditions. For example, because a steep roof sends more load to the header, you might need a thicker or engineered beam.
Use printed span tables to verify the calculator’s results. Compare your numbers with the IRC standards to make sure everything meets code. Accurate load calculations ensure your header can support the weight from both normal and heavy conditions. Adjust your design as needed to prevent any sagging or misalignment.
Finally, double-check every measurement. Proper load-bearing sizing is key for transferring the weight above the window to the supporting walls and foundation safely.
Building Code Compliance for Window Header Framing

When you build a window header, following the building code is key to safety and durability. The International Residential Code (IRC) sets clear rules. It tells you the header size, the nailing pattern (for example, using 10d nails at 32 in [81 cm] on center), and the stud positions (vertical supports) that will properly share the load.
Inspectors look for a header that stands plumb, is level, and is fastened as required. Check that every nail or connector follows the code's spacing. Always write down and double-check your measurements.
In some areas, extra reinforcement is needed. In regions with high winds or earthquake risks, you may use seismic straps (metal connectors to secure the structure) or engineered beams. Follow these local guidelines and keep any extra documentation handy.
Keep proper clearances around the header to avoid future issues. Write each step and measurement in your records. For example, note: “Installed header with 10d nails at 32 in (81 cm) on center as per IRC standards, ensuring proper stud alignment and clearance.”
Document all engineered details accurately to help ensure that your header meets both safety and building code requirements.
Troubleshooting Common Issues in Window Header Framing
Headers that sag are often a sign of undersized lumber. If you see a header bending, check that the span matches the size of the lumber you’re using. For example, if a header over a 6 ft (1.8 m) opening bows, try using a stronger beam or larger lumber to support the load properly.
Warped or twisted lumber can throw your header out of alignment. Only use straight, well-stored lumber and inspect each board before cutting. This quick check can save you from surprises later on.
Poor nailing or weak connectors might cause the header to rotate. Always follow the code’s nailing patterns and connector details. Use the correct 10d or 16d nails, spaced as recommended, to keep the header securely in place.
Gaps under the header can lead to shifting over time. Fill any voids with shims (foam or plastic) to ensure the header sits level. This simple fix helps keep the header stable and precise.
Advanced and Energy-Efficient Window Header Framing Options

To boost your window header's energy efficiency, try insulated framing methods. One option is to add rigid foam insulation or continuous insulation blocks. This stops unwanted heat loss while still keeping the frame strong.
Another option is using engineered wood beams, like LVL (laminated veneer lumber). These beams have built-in insulation to offer high R-values (a measure of thermal resistance) and support heavy loads. They work well if you want both durability and energy savings.
You can also use prefabricated insulated header units. They include a moisture barrier that makes them easy to install and helps avoid mistakes on the job site.
For a more sustainable choice, consider materials like composite or pressure-treated lumber for exterior headers. Pressure-treated lumber is treated to resist moisture and decay, keeping your project safe over time.
These techniques build solid headers that also help keep your home energy-efficient, especially in climates where every bit of saved energy matters.
Final Words
In the action of window header framing, you’ve learned to mark openings, cut and assemble headers, align stud placements, and secure materials per code. We covered everything from selecting proper lumber and spacers to troubleshooting common issues like sagging or misalignment. With clear steps and practical tips, you can confidently tackle header framing for any window opening. Stay safe, follow the specs, and know you’re building strong, energy-efficient spaces that stand the test of time.
FAQ
What is exterior window header framing?
Exterior window header framing means supporting a window opening with beams designed for outdoor conditions. It uses pressure-treated lumber and proper spacers to maintain structural integrity and weather resistance.
How do I use a window header size chart and framing calculator?
A window header size chart shows header dimensions based on span and load. A framing calculator helps determine the right lumber size and span details so your header meets safety and code requirements.
What are the header framing details?
Header framing details include the layout of two dimensional lumber members with a spacer board, the nailing pattern with 10d or 16d nails, stud placements, and shimming for proper level and square installation.
What does building code require for window header framing?
Building codes require proper header spans, stud placements, and nailing patterns. They also mandate regional additions like seismic straps in high-wind or earthquake areas to ensure the header safely carries imposed loads.
What are the requirements for a window header?
The requirements for a window header include proper load-bearing calculations, correct lumber grading and sizes (usually two 2x12s), a matching spacer board, and adherence to IRC span tables and local building codes for safe installation.
Can a window header be made from 2×4 lumber?
Using 2×4 lumber for a window header is not recommended because it lacks sufficient strength. A proper header typically requires larger members, such as 2x12s, to safely span the opening and support the load.
Can I use a 2×10 for a window header?
A 2×10 may work for short spans and minimal loads, but it is often undersized. Always perform load calculations and check code guidelines to ensure that a 2×10 header will provide the necessary structural support.
What should I use for a header when putting in a window?
For installing a window header, use quality dimensional lumber like 2x12s or engineered beams along with a spacer board (plywood or rigid foam) that matches the wall depth to ensure proper load distribution and stability.