
Ever notice how some walls have that smooth, even look? Taping drywall seams is the secret to a strong, polished finish.
First, clear the surface of any dust so the compound sticks well. Next, spread a thin coat of joint compound (a plaster-like mud) over the seam. Then, press paper tape (a long, narrow strip used for reinforcement) onto the compound.
Allow the first coat to dry before adding a second coat. Finally, apply a third, finishing coat. Each layer helps fill in gaps and create a seamless joint.
Follow these steps and watch your wall transform into a crisp, clean surface.
Mastering Taping Drywall Seams: A Complete Step-by-Step Guide
Start with a clear plan. Check out the overall taping process on Drywall Installation Steps for a full picture before you begin. Clear your work area by brushing off dust and loose debris from the seams. Then spread a thin, even layer of mud (joint compound) over flat seams. This helps the paper tape stick securely and keeps the finish smooth.
Next, press paper tape into the mud. Paper tape blends with the compound better than mesh tape, which can leave a rough texture when over-sanded. Lay the tape carefully over the mud and push out any trapped air bubbles.
Now, follow a three-coat system:
- First coat: Use a taping knife to firmly press the tape into the mud, ensuring complete coverage.
- Second coat: With a 10-inch (25 cm) knife, feather the mud smoothly around the tape so it blends into the wall.
- Third coat: Apply a thin skim coat to achieve a completely smooth finish.
Allow each coat at least 24 hours to dry before sanding. Start with a sanding sponge on surfaces that are lightly dried, then use sandpaper until the area is even with the rest of the wall. Check for any bumps, and if you see any, lightly sand and touch up as needed.
This guide gives you a clear, step-by-step method to get smooth, crack-free drywall seams every time.
Essential Tools and Materials for Drywall Seam Taping

Before you begin your drywall seam taping project, make sure you have all your tools ready. Gather a mud pan (a container for holding drywall mud), taping knives in 6 in (15 cm), 8 in (20 cm), and 10 in (25 cm) sizes, a corner mud roller like the Columbia Corner Mud Roller with an 18 mm gap, sanding blocks, a drywall knife, and a finishing trowel. For a complete list of equipment, check out the article at Tools for Drywall Installation.
Choose a quality joint compound to get the best finish. Use a setting-type compound that hardens in 20, 45, or 90 minutes; a lightweight option makes sanding easier. For small repairs or touch-ups, a pre-mixed all-purpose compound works well.
Always clean your pans and mixing tools after each use. Leftover compound can mix with new batches and cause them to harden too fast. A clean work surface ensures the mud stays at the right consistency for a smooth, crack-free finish.
Plan your shopping and prep so that each step, from mixing the compound to embedding the tape, flows smoothly and efficiently.
Mixing Joint Compound: Achieve Ideal Consistency Every Time
Start by adding the powdered compound to your mud pan. Slowly mix in water until the blend turns into a smooth paste. For instance, combine about 2 cups (480 ml) of the powder with water gradually, stirring until it has the consistency of smooth pancake batter. This texture is key because it makes it easier to embed the tape (used to cover joints) and smooth out seams. Quick tip: lighter compounds are easier on your sanding tools, which saves effort later.
Keep the available setting times in mind, typically 20 minutes, 45 minutes, or 90 minutes. Choose a fast-setting mix if you are covering a small area, but remember that a shorter pot life means you need to work quickly. Stir the mixture well but avoid overmixing; too much agitation can reduce your working time. Clean your mud pan and tools between batches, as even a small amount of leftover compound can cause fresh batches to harden too soon.
Getting your mix just right speeds up application and helps each coat on your drywall seams adhere evenly and dry correctly. Take your time with this step so that your finish is smooth and dependable.
Mesh Versus Paper Tape: Selecting and Applying the Right Material
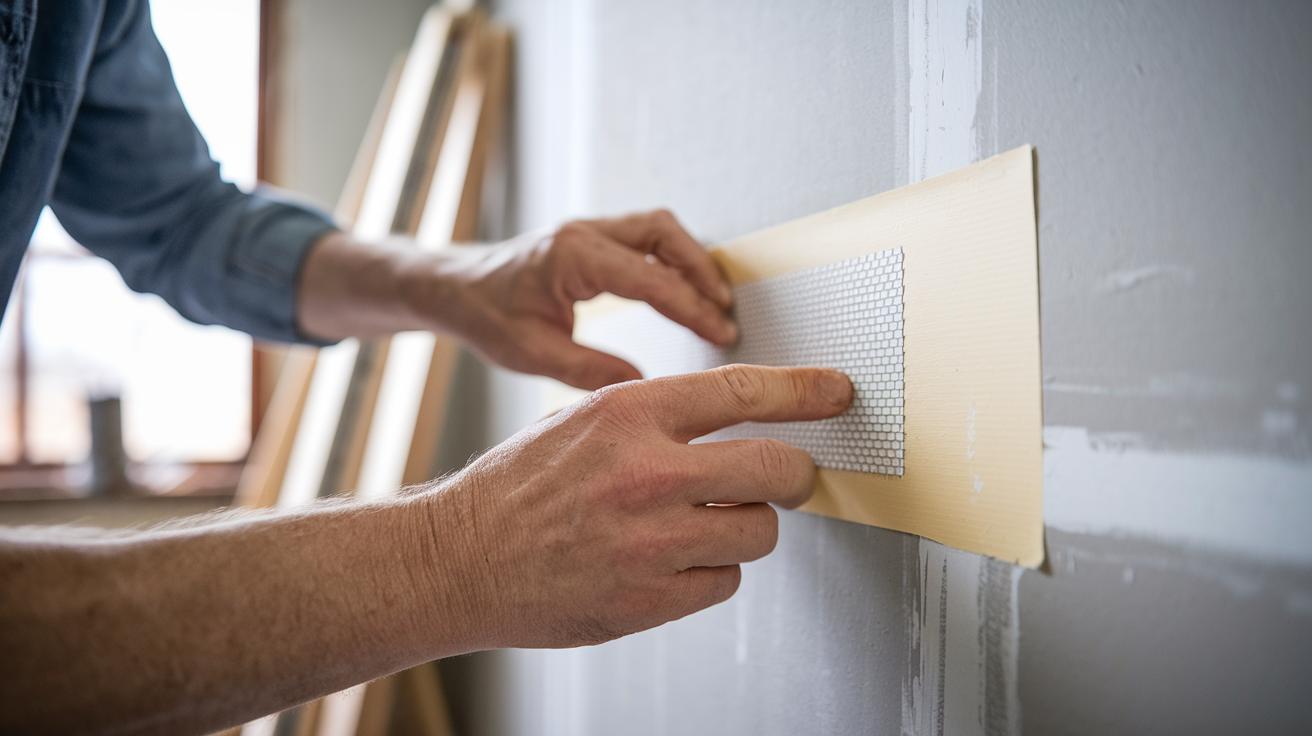
Mesh tape comes with a sticky backing that lets you press it right into place. This makes it handy for fast repairs, especially when you’re working on high walls and need to finish quickly. Keep in mind that if you sand too much, the mesh texture might show through. You might have to add another thin layer of mud (joint compound) to cover any rough spots.
Paper tape needs a bit more care. First, spread a thin, even layer of mud along the seam. Then firmly press the paper tape into the mud with a taping knife until it sits flat. This method gives you a nearly invisible seam and a smooth finish, which works well on flat surfaces and inside corners. Pre-creased paper tape is especially helpful for inside angles. While this process takes a bit more skill, it results in a cleaner, more professional look.
Both tapes have pros and cons. Mesh tape cuts installation time and works well in tight spots. On the other hand, properly embedded paper tape offers better durability and a sleeker finish. Choose the tape that fits your project, go with mesh for speed or paper for a flawless seam.
Flat Seams and Butt Joints: Proven Taping Techniques
For flat seams, start by spreading a thin layer of joint compound about 1/8 in (3 mm) thick over the seam. Use a taping knife to spread the compound evenly. Press the paper tape into the compound with firm pressure to push out any air pockets, like firmly sticking a label in place. Then, smooth the tape with a side-to-side knife stroke to eliminate any remaining bubbles.
For butt joints, begin by trimming off any loose drywall paper from the edges. Next, apply a consistent 4 in (10 cm) wide strip of compound that is 1/8 in (3 mm) thick along the joint. Lay the tape over this strip and embed it with steady pressure. Make sure there is no more than 1/16 in (1.6 mm) of compound under the tape. A thin compound layer helps prevent visible ridges after you finish.
When you face seam gaps wider than normal, first fill the gap with a setting-type compound to form a solid base. Lay the tape over the filled gap and press it with your taping knife. Finally, apply two feathered coats of compound using a larger knife each time to blend the edges into the wall surface. Following these steps will give your horizontal and vertical joints a clean, smooth finish that sets the stage for a flawless wall.
Finishing Corners and Edges: Proximity Taping Techniques
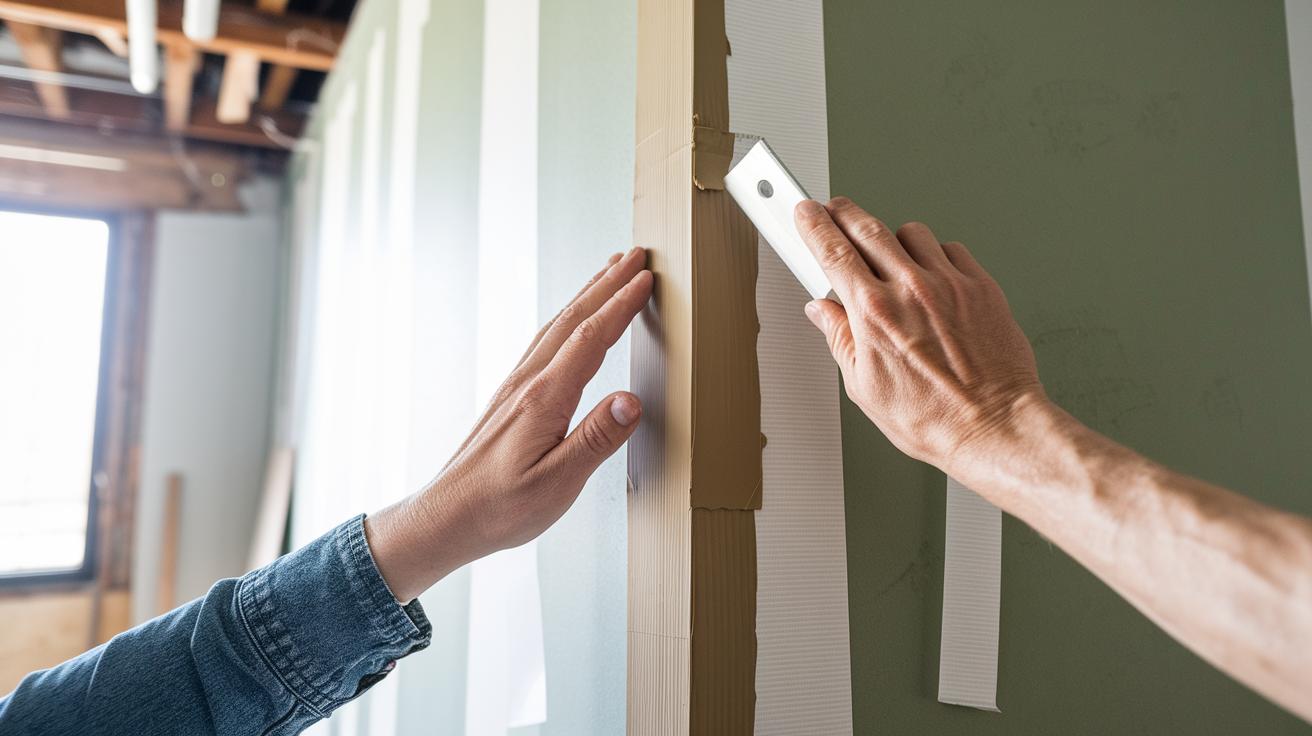
For corners that rank about 6/10 in DIY difficulty, use a steady method for both inside and outside joints. For inside corners, run a mud ribbon that measures 1/8 in (3 mm) by 2 in (5 cm) along the angle. Press pre-creased tape into the mud with a taping knife and wipe off any extra compound right away. This keeps the line clean and reduces bumps.
For outside corners, build a strong bead by first spreading plenty of mud to fill the pocket completely. Lay the paper tape over the mud to cover the entire corner. Use a corner roller or a 6 in (15 cm) knife to press the tape in firmly for a solid bond. Then, run a 10 in (25 cm) knife along the edge to smooth the compound into the wall.
Keep checking your work as you go. If you notice gaps or bumps, add more mud or feather it out until the joint is even. This careful approach not only makes the wall look sharp but also strengthens the seam for long-lasting durability.
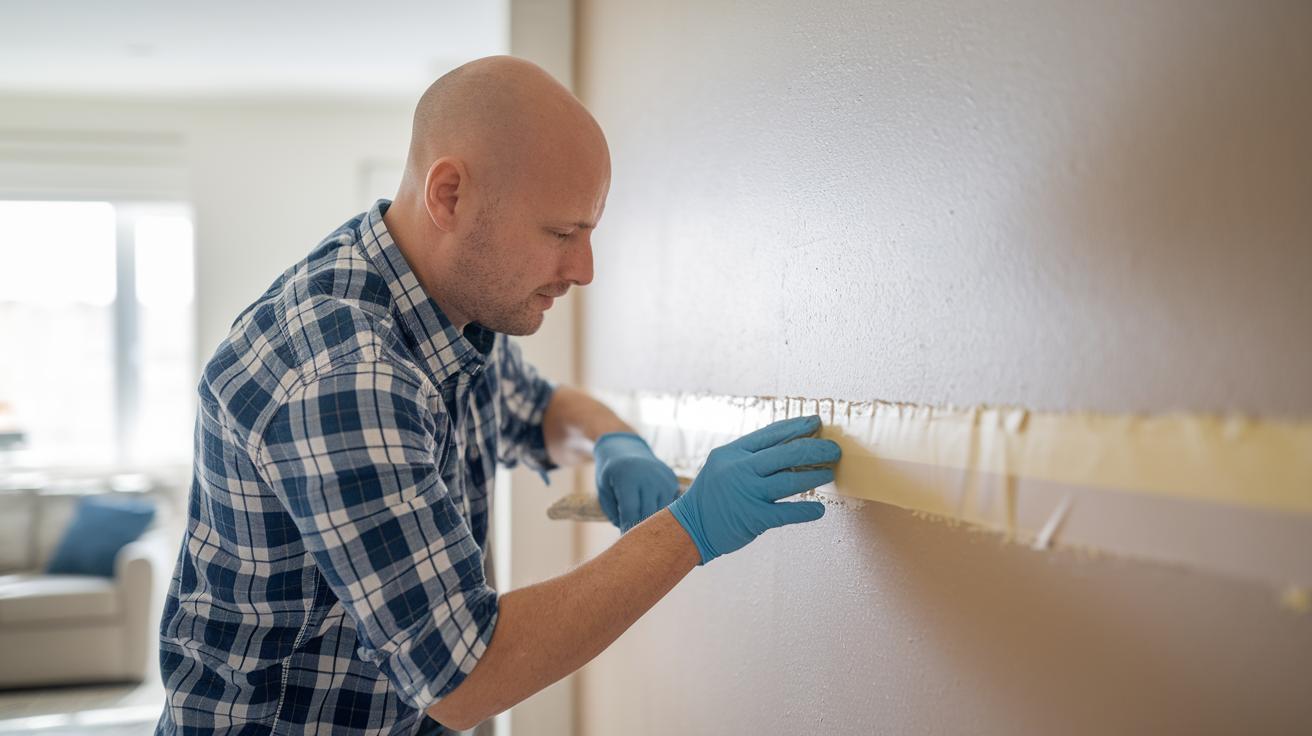
Sanding and Polishing Drywall Seams for an Invisible Finish
Wait 24 hours after the last coat of joint compound so it fully cures. Then, use a damp sanding sponge to soften the edges and blend the dried compound. This helps smooth the transition for a better finish.
Next, grab some 100–150 grit sandpaper and sand with a steady back-and-forth motion to even the texture. Look over the area for any air bubbles or bumps.
If you spot a bubble or rough spot, trim it carefully with a utility knife and cover the spot with a thin layer of joint compound.
If there are still slight low spots, apply a light skim coat and sand again until the surface is smooth and ready for paint.
Troubleshooting Tape and Compound Failures
For a small tape tear that is less than 12 in (30.5 cm), start by cleaning off all dust and loose debris from the area. Next, apply a fast-setting compound over a 4–5 in (10–13 cm) strip on both sides of the tear, think of it like spreading a thin layer of peanut butter on toast. Let the compound cure completely before sanding it flush with the wall. Use a sanding sponge or fine sandpaper until the patch is smooth, then repaint the area. This fix keeps your seam neat and even.
If you have a major tape failure or widespread compound issues, begin by carefully removing the old tape with a drywall knife. Then, sand the area using 150-grit sandpaper until there are no loose particles or uneven edges left. Reapply new tape, ensuring you overlap by 1–2 in (2.5–5 cm) on each side. Use a joint knife to spread the compound at a 45° angle. Next, sand the patched area using 100–150 grit sandpaper with smooth, steady strokes. If you see bubbles in the compound, they indicate trapped moisture. In that case, trim away the bubble with a utility knife, apply a thin layer of compound, and let it dry for up to 72 hours before sanding again.
- Minor tear steps: clean the area, apply compound over a 4–5 in (10–13 cm) strip, let it cure, sand, then repaint.
- Major failure steps: remove the old tape, sand with 150-grit sandpaper, reapply tape with a 1–2 in (2.5–5 cm) overlap, apply compound at a 45° angle, and sand with 100–150 grit sandpaper. If bubbles appear, cut them out, reapply a thin compound layer, and let it dry for up to 72 hours before sanding.
Streamlining Your Drywall Taping Workflow
Plan your work into clear, separate chunks. For example, set aside Saturday morning just for preparing surfaces and taping. This way, you use the natural drying breaks between coats efficiently.
When working on tall walls, start at the bottom and move upward. Beginning at the base helps keep the compound from sagging, much like you’d start painting a tall wall from the bottom to work with gravity.
Keep a close eye on your compound mix timing. Clean your tools between batches to avoid dried-on residue that can slow you down.
These planning tweaks reduce wait time and cut out the extra steps in detailed instructions.
Advanced and Professional Finishing Strategies

Start by checking each seam carefully. Run your fingers lightly over the joint after applying the second coat to feel for any bumps or rough spots. If you find a pinhole or any unevenness, mark that spot so you can give it extra sanding attention later.
Next, use a lightweight compound. It makes smoothing out little imperfections easier without removing too much around them. For larger projects or commercial jobs, think about using edge protectors and trying cornerless joint methods. These techniques help make the work more efficient and reduce the need for extra touch-ups down the line.
When you're working on large panels, try using specialty tapes like the Columbia Corner Mud Roller covers. They help keep the finish consistent and professional. Set up quality checks by reviewing your work after each coat and finishing with one meticulous final sanding. This extra bit of care ensures that your seams are smooth, strong, and ready for any further treatment such as painting.
Final Words
In the action, the post breaks down taping drywall seams into clear steps, from mixing compounds and choosing the right tape to finishing corners and troubleshooting mistakes. Each section offers practical tips and lists needed tools to keep your project on schedule and budget-friendly.
The goal is to give you hands-on strategies that lower mistakes and boost your confidence. With these clear directions, you're ready to tackle your next project and master the art of taping drywall seams.
FAQ
How to use taping drywall seams?
Using taping drywall seams means applying a thin layer of joint compound, embedding the tape firmly, and then feathering out the edges with subsequent compound coats to create smooth, crack‐free joins.
How to tape drywall seams on the ceiling?
Taping drywall seams on the ceiling follows the same process as on walls, but you may need smaller tools and extra care to hold the tape in place while the compound sets and levels.
How should beginners approach taping drywall seams?
Beginners should start by embedding the tape in a thin coat of mud, then apply wider, feathered compound layers after each drying period, ensuring each coat dries fully before sanding and moving to the next.
How to tape drywall seams with mesh tape?
Taping drywall seams with mesh tape involves using self-adhesive mesh applied directly over fresh mud; be aware that extra skim coats might be needed to smooth out any texture differences compared to paper tape.
How does Home Depot tape drywall seams?
Home Depot taping drywall seams typically follows standard industry techniques, with quality tools and joint compounds ensuring reliable application and a consistent, smooth finish on drywall installations.
Why are drywall seams showing on the ceiling?
Drywall seams showing on the ceiling usually indicate that the tape wasn’t completely embedded in the compound or too few coats were applied, resulting in visible ridges and uneven transitions.
In what order do you tape drywall joints?
The standard order is to prep the surfaces, apply a thin coat of mud with the tape embedded, and then layer additional feathered compound coats, allowing each to dry fully before sanding and smoothing.
Should gaps in drywall be filled before taping?
Filling gaps before taping provides a stable base; larger gaps should be pre-filled with a setting compound to create an even surface that allows the tape to bond properly during finishing.
Do drywall seams need to be taped?
Drywall seams need to be taped to reinforce the joints, prevent cracking, and create a smooth, continuous surface that is ready for painting or other finishes.
What are common drywall taping mistakes?
Common mistakes include applying the compound too thickly, not embedding the tape properly, using the wrong tape type for the job, and skipping proper drying times, which can all lead to visible seams or cracks.